Monday, November 30, 2009

Oh Christmas Tree, Oh Christmas Tree...


I love a decorated Christmas tree. I don't really love decorating it, but I do love picking out the color combinations, the "stuff" that will make up the look I'm going for and the finished product. In a recent post, I gave a step by step on tree decorating...so, I won't do that again here.


We aren't actually here for Christmas, so we just put up one tree these days. It is about 7-7 1/2 feet tall. This year, I put on 1200 white lights. That is a lot of lights, but it really makes the tree look pretty. It almost didn't need ornaments. I decided to use a brown, bronze and aqua theme this year, with hints of gold. I actually have expresso leather sofas, and use aqua pillows and accent pieces...so for once, the tree matches the rest of my things.

I always put things on the tree in layers. The aqua icicles went on first, then the glittery brown snowflakes. I added lots of "ice" frosted twigs and then I started putting on the actual ornaments.


I love the bronze glittered twig/stick things (that is a technical term) which went on after the ornaments. I just put them randomly throughout the tree, along with some golden poinsettias.


I wouldn't want anyone to think that I wasn't sentimental. While the ornaments that the kids made are all nicely boxed in the basement, I did add a few hints of my Disney daughter, who doesn't get to come home during the holidays.


I explained in my other tree post that I like my tree topper to be a bit strange. I like things to stick up and out every which way. I think I accomplished that this year.


Overall, I'm happy with the way it turned out. The brown/bronze was a new color for me this year. I had to start from scratch and I would have liked about another 50 pieces of stuff to add to the look. I do notice that the browns don't show up against the green as well as some colors I've used, but I still like the look. What do you think?


I am participating in Tuesday's Deck The Halls this week. Susan @ thoughtsfromovertherainbow is our hostess. Please check out her site for links to the other participants. I'm sure we will see some wonderful decorations.

Sunday, November 29, 2009

Let Me Show You A Little Secret-Met Monday


After a very busy four days, I'm finally able to sit down and write a few things. I decided that I would join Susan @ Between Naps on the Porch for my first Met Monday. Please check out the other blog links, you will be amazed at how talented some of our blog friends are. What I am doing barely qualifies, but it is transforming something to something "better"!

I have a love/hate relationship with poinsettias. I got married 3 days after Christmas, a long, long time ago. My bridesmaids carried pink poinsettias, so they are very special to me. What I've never really enjoyed is the "typical" potted poinsettia. It always reminds me of something I would have taken my grandmother or my piano teacher. I've mentioned before that I used to help a good friend who was a florist on holidays. I learned a little secret about poinsettias that I have been using ever since. Now, I love the way they look!


It all starts with a basic poinsettia plant. This one came from our local farm store for $5.99, it had 5 huge blooms. Any color will do, or it is beautiful if you mix the colors.

The next thing you need is a vase. I like to use something in the bottom of mine. These are glass stones with just a hint of green to them. My vase was about 10 inches. It could easily have been larger, but I didn't want much height for what I was doing.

I suggest you put down newspaper before you continue. I didn't this time and I had a bit of a mess to clean up. Cut the blooms off of the plant down near the base so that you have a bloom on a long stem. Poinsettias have a milky sap that really isn't poisonous, but don't eat it anyway! The sap will drip where the stem is cut and anywhere you strip a leaf off. I remove most of the bottom leaves from each stem.


Now the important step. Using a lighter or a match, torch the cut part of the stem for a few seconds. The sap will bubble and the stem may even blacken a little. This seals the stem.

Arrange the blooms in your vase, just as you would any other cut flower. Let the vase sit on the newspaper for a while until the sap stops running from the leaf cuts.

My blooms were so large, I really should have gone with a taller vase. Seeing the pictures, I may change that. The poinsettias will stay fresh in water for several days as long as you have the stem sealed. We used to take all of the blooms that would break off the various colors of plants when we unpacked them and make big bouquets with all the colors. It was gorgeous and makes a wonderful, unusual and inexpensive centerpiece for your Christmas table. This isn't the best picture...but, it does introduce you to our very spoiled "child" of the house. She is 13 1/2 and still going strong. You also get a peek at the tree. There will be more about it coming soon. In this picture it looks as if it only has 2 ornaments!


Saturday, November 28, 2009

Blogging and Husbands Don't Mix

My husband had 4 days off  for Thanksiving.
 I'm having a very Hard time getting around to Writing anything.
We have been trying to get some Shopping done.
I have the Tree almost decorated.
 The Wreath done for inside the house.
He's been working on the outside Lights.
Today we will visit taking a Drive
to put the evergreen "pillows" on my Grandparent's graves.
I'm not finding much Time to read all of your blogs.
 I will try to Catch up in the next few days.
I hope you are all having a Wonderful weekend.

Wednesday, November 25, 2009

Pears and Bargains, Tablescape Thursday


     This week is Thanksgiving, as well as Tablescape Thursday. I wish you all a day filled with love, family and wonderful food. Please take some time today or tomorrow and visit our hostess Susan @ Between Naps on the Porch to get some great table setting ideas from  the other participants.

     I really planned on doing a holiday tablescape this week. Of course that was before I went to Cracker Barrel and found the fall tureen and ladle on sale for half price! It is my first soup tureen, but I'm sure it won't be my last. I never really wanted one, then I joined in with Tablescape Thursday.


As you can see, it is very detailed. What you can't see is the pear that is in the cornucopia, I forgot to take a picture of that side. I used a a branch with some sugared fruit and just a touch of holiday glitz.


The dark green plates are from Wal-Mart. The salad plates I bought last month for $1 each at TJ Maxx. The crystal I've had for several years, as well as the gold flatware. I remember buying it years ago and I never used it until I set this table. I forgot all about it until I started tablescaping. The tablecloth is vintage with leaves and of course my gold napkins.


Aren't these cute for $1?


Tuesday, November 24, 2009

Do You Need One More Thing On Your Menu?

You know those meals where you just need "one more thing" to fill in the menu...this is the salad for you. It takes only a few minutes to make and doesn't require a ton of ingredients. I've had this recipe for 30 years. It says that I got it from Carol Johnson. Who is Carol Johnson?


Cauliflower Salad Ingredients:
1 head cauliflower, washed and broken into bite sized pieces
1 green pepper chopped
1 jar pimento drained (small or large jar-you can find this with the vegetables)
1 can pitted ripe olives drained (any size olives-these are medium)
optional-1 onion chopped (I don't use onions when I cook)

1/2 tsp. pepper
1/2 tsp. sugar
1 tsp. salt
juice from 1 lemon or 2 T. bottled lemon juice
3 T. vinegar
1/2 cup vegetable oil


Put cauliflower, pepper, pimento, olives and onion (optional) in a large bowl. Sprinkle with salt, pepper, sugar...pour on lemon juice, vinegar and oil. Toss to cover all the salad ingredients. You can serve immediately, but it is even better if it sits in the refrigerator for a while and marinates. It is very easy to double this recipe for a larger crowd.


The colors make this salad a nice addition to a Christmas meal. I like the leftovers as a meatless lunch. Enjoy!


Sunday, November 22, 2009

My Favorite Gift...And It Didn't Cost Anything


     What is it? This was a Christmas Gift from my daughter a few years ago. It is a memory jar. It is something that I would grab on the way out of the door if the house was on fire. I actually made one for my parents a few years ago and a couple of years later, my daughter made one for me.

     You really only need a jar of some kind. It can be a decorative jar with a fancy bow, or a plain jar with a piece of ribbon around it. I promise you that the person you give it to will treasure the gift.


     All you need to do is spend a few days making a list of memories you share with the person/people you are giving it to. They can be good memories or even sad memories, the point is that they are special memories that will make the person who reads the note stop, smile and remember. Cut some small strips of paper (scrapbook paper is a good option, but computer paper works). Write a memory on each piece and fold it in half. Fill your jar. It is more difficult than you think, so allow a few days to really think about it. I went all the way back to my earliest memories with my parents, my daughter did the same...she just didn't have to remember as far back!


     The above note (I told my daughter what I was sharing) was in my jar. My daughter was very ill on a Disney vacation when she was 5. While our luggage was staying in an expensive Disney hotel...all four of us spent several days and nights at an Orlando hospital. I slept at the foot of my daughter's bed. She was fine, but it certainly is a memory for our family.

     My daughter is 25 and she moved to Orlando 2 1/2 years ago, to work for Disney. I guess the experience didn't ruin her opinion of WDW. She is a remarkable young woman and we have a very special relationship. In other words, I miss her like crazy...but, she is living her dream and that makes me very happy. On days when I'm really missing her, I just pull a little note from the jar and somehow she doesn't seem so far away.

Saturday, November 21, 2009

Easy, Cheap and Impressive...Do I Have Your Attention Yet?

I didn't do much cooking this week, so my blog has lacked in food ideas. It has been one of those weeks where I kept doing things that left me on a heating pad...and not standing in the kitchen. I can't even blame "old age" on my injuries...just being a klutz. Finally, last night I made one of my "regular" recipes.


Nothing makes a house smell as good as homemade bread baking. It also makes a great gift when someone moves in next door or you want to do something special for someone. It doesn't cost much to bake bread and yet anyone you give it to will be impressed. I have a simple recipe that I use all the time. The great thing about this dough is that you can make a loaf of bread with it, or individual rolls, cinnamon rolls or even a slightly sweet pizza crust. It all depends on how you shape it.

You can mix this dough in a bowl by hand (which I did for many years) or you can prepare it in a bread machine, which I do now. I just make it in the machine at the "dough" setting, then remove it and do the rest by hand. I don't like my bread to be in a square like the machine makes it. I do find that the machine dough is smoother than anything I ever accomplished by hand, but it certainly isn't necessary for it to taste great.

Ingredients:
1 cup warm water
1 T. olive oil
1 egg beaten with a fork
1 tsp. salt
6 1/2 Tablespoons honey
3 1/2 cups flour
2 tsp. yeast (1 packet as shown) don't use fast rising


Pre-heat the oven to 350 degrees

Place the ingredients in the bowl (or bread machine bowl) as listed, making a "well" in the flour for the yeast.


Either put the bread machine bowl into the bread machine and turn it on at the dough setting or mix the dough gently with a spatula, until well blended. Place on floured surface and knead the bread until smooth. The dough should look something like the picture below after you are done kneading it.


If you are using the machine, just let it run through the dough process and remove it at the end. Mine take 1 1/2 hours. If you are doing it by hand, once the dough is smooth, place it in a large bowl that has been coated with olive oil, flip it once so that all sides get a light coating of the oil. Cover with a clean dish towel and set it aside for 1 hour in the warmest part of your kitchen. It should rise to about double in size. Remove the dough from the bread machine or from the oiled bowl after it rises and place on floured surface.


This is when you will shape the bread however you want it. Last night, I just made loaves. I split the dough into 2 equal pieces and shaped out long loaves of bread. Place them on a greased and floured baking sheet, cover with a clean towel and let them rise again for about 30 minutes. Bake at 350 degrees for around 20 minutes, start checking the bread as soon as you can smell it. It should be golden brown.

For rolls, I pinch the large ball of dough into two pieces, then pinch those two pieces in half and then all four pieces in half. This will make  8 large rolls that can serve as buns. Cut them in half again for small dinner rolls. Place on greased and floured baking sheet, cover with a clean towel and let rise about 30 mintues. Bake them at 350 degrees for about 10-15 minutes depending on the size...watch closely.

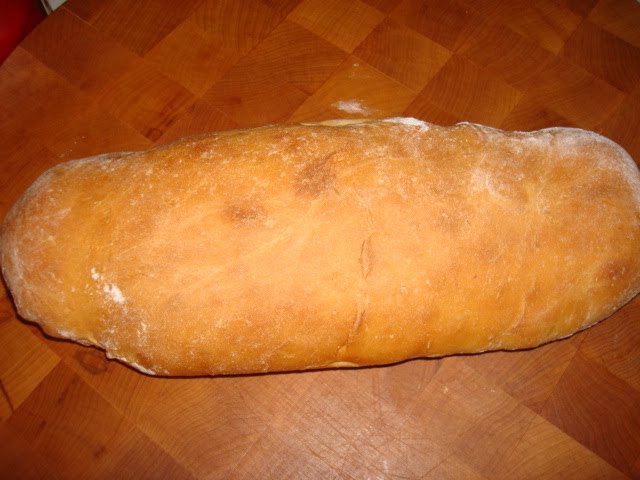
For cinnamon rolls, roll the dough out into a large rectangle (about 12 x 8). Melt a stick of butter and pour it over the rectangle. Make a mixture of cinnamon and sugar (I don't measure, but you want the sugar mixture to cover the rectangle. Start with a cup of sugar and 2 tsp. of cinnamon, make more if you like them to be very gooey) sprinkle the sugar mixture over the top of the butter, add nuts if you like and roll them up jelly roll style so that you have a 12 inch roll when you are done. Slice them into I inch slices (you should get 12 rolls) and place cut side down in a greased 9x13 pan. Cover with a clean towel and let rise 30 minutes. Bake at 350 degrees for about 15 to 20 minutes until golden brown on the top. Frost with any buttercream frosting if you choose. Below is the dough after I shaped it into a loaf, before the 30 minute rising period.


Sometimes when you are making bread, it just doesn't work out. I made the above bread last night for us, very quickly. It turned out fine. Today I made another batch that I was going to give to someone. It didn't rise. I used a different brand of yeast (the store was out of my regular brand) so that may have been the problem. Sometimes yeast can be too old, never use it past the date...it won't work. Most of the time it turns out great, but I've been making this bread for 15 years and I still have some flops, so don't give up if you don't get it perfect the first time. Enjoy!

Wednesday, November 18, 2009

Winter is in the Air-Tablescape Thursday


Thursday, my favorite day of the week is here again and Susan @ Between Naps on the Porch is our hostess for another week of beautiful tables and clever ideas. Please check out some of the other tablescapes, you will be amazed at the talented bloggers in our midst.


I really had no idea until this morning which direction I was going to take my table this week. In truth, I'm tired of using my gold napkins and fall colors. I wasn't quite ready to take on Christmas, so I decided to try a casual winter theme in black and white.


I used a vintage tablecloth and topped it with black placemats from Kohls. Next came my square white plates and black salad plates (both from WalMart) topped with a cute little snowflake appetizer plate from Crate and Barrel. Glasses with black spots, everyday flatware and white napkins finish the look.


Instead of using napkin rings, I used "ice" frosted branches. I also added red votive candles in my 50 cent, lead crystal votive holders from a local thrift store. I thought the table needed a "pop" of color. 


In the center of the table, two sparkling trees, a sleigh music box that was one of my last gifts from my grandmother, a gilttering sea urchin.


A scattering of silver stars.


I added a few black and white ornaments from my black and white tree of a few years ago. I dimmed the lights, lit the candles and enjoyed a winter wonderland.